Thursday, June 5, 2014

DIY Macrame Plant Holder: Complete in under an hour!

There are few things better than quick projects with instant gratification. No waiting hours for paint to dry or processes that require a few days to complete. This is one of those quick projects!

Macrame has been making a come back since its prime time in the flower child decade. For those that are unsure of what macrame is Google provides us with this definition:

macramé
məˈkrɑːmi,-meɪ/
noun
  1. the art of knotting string in patterns to make decorative articles.

I have decided that my front door needs some color. I will be painting it in due course but this was a quick project that gave me a good head start. This is what our front door area looks like.


All you will need for this project is:

  •  rope/cord (I happened to have a spool of natural sisal looking cord on hand) 
  • a ruler
  • a plant pot or vase


I cut 4 lengths of the cord that measured 8ft. I held the 4 lengths together in one hand at the same height and folded them in half at the midpoint. This creates the loop at the top that the plant holder will hang from. I then tied a knot about 3 inches from the midpoint to secure the loop.


Now I have 8 strands of cord and a loop at the top. I separated the eight strands into four groups of two.


I start tying knots from the top and worked my way down. I took the first group of 2 strands and measured 14" from the loop knot. That is where I tied my first knot. 


I tied knots in the 3 remaining groups of 2 cords all measuring 14" from the loop knot. Take your time a be sure the knots are even.


Now you have your loop knot and the first set of knots that will make up your holder. Lay your strands next to each other and try to make them flat so they are not twisted at the top. You will then take the left strand of one of your groups of 2 and tie it the the right strand of the group that is adjacent to it. Do this to all of your strands until you end up with another 4 knots. At this point you should hold up your partially finished plant holder and fit it over your plant pot. This way you know if you made your knots correctly. It should fit around your pot in a circle with none of the strands crossing through the middle. If you find that you made a mistake. Just untie the knot that is incorrect and correct it. 


At this point I would suggest that you should put the plant holder over your pot to determine where you should tie your final set of 4 knots. I decided that I wanted those knots to be right at the base of my holder. With the plant holder over the pot I measured the distance from my last set of knots to the bottom of the pot. It was about 4.5". I then did the same thing as in the previous step. Tied the left strand from 1 group of 2 to the right strand of the adjacent group. 

This is what it looks like with the three sets of knots. This is what will make the nice "V" design around the sides of your pot.


Finally I measured the distance between the edge of the pot to the center of the pot's bottom. I then measured that distance from the last set of knots and held all of the strands together with one hand. I held the top of the holder up with my other hand and pulled to be sure the strands were all even. I then tied the last knot which is one big knot including all eight strands. This will be the knot that your pot will sit on. 


This is what the pot holder looked like when I put my vase in it. This part of the project took about 15 minutes. I'm sure it could take much longer depending on how ornamental you want your plant holder to be. More knots = more time. 


Now onto the hanging stage! 

The overhang for our front door is made of sheet rock. Unfortunately this meant that I could not hang the pot exactly where I wanted it (in the center of where our little window is). There was not a stud to hold the screw secure. Not setting the screw into a stud (piece of wood) could mean my whole project crashing to the ground given a plant with soil etc. So I drilled into the front part of the overhang into a stud there. 


After you've got your hole drilled screw in a hook that is long enough to go through the sheet rock and into the wood. Now hang your masterpiece! 


 I did not have a plant on hand and we were having people over so I cut a few pieces of bougainvillea from our yard and added them to the vase with some water. 


Hope you all try this quick project out. You can also do this inside your house to hang plants near windows etc. Have fun :)


post signature

Thursday, May 29, 2014

Old Made New: Vintage Finds!

Hello Everyone! I am so excited to share with you a few of the fabulous finds that I have acquired for our house. I am lucky enough to know someone that has been in charge of getting rid of some old furniture that happens to be so fitting for our home's theme. 


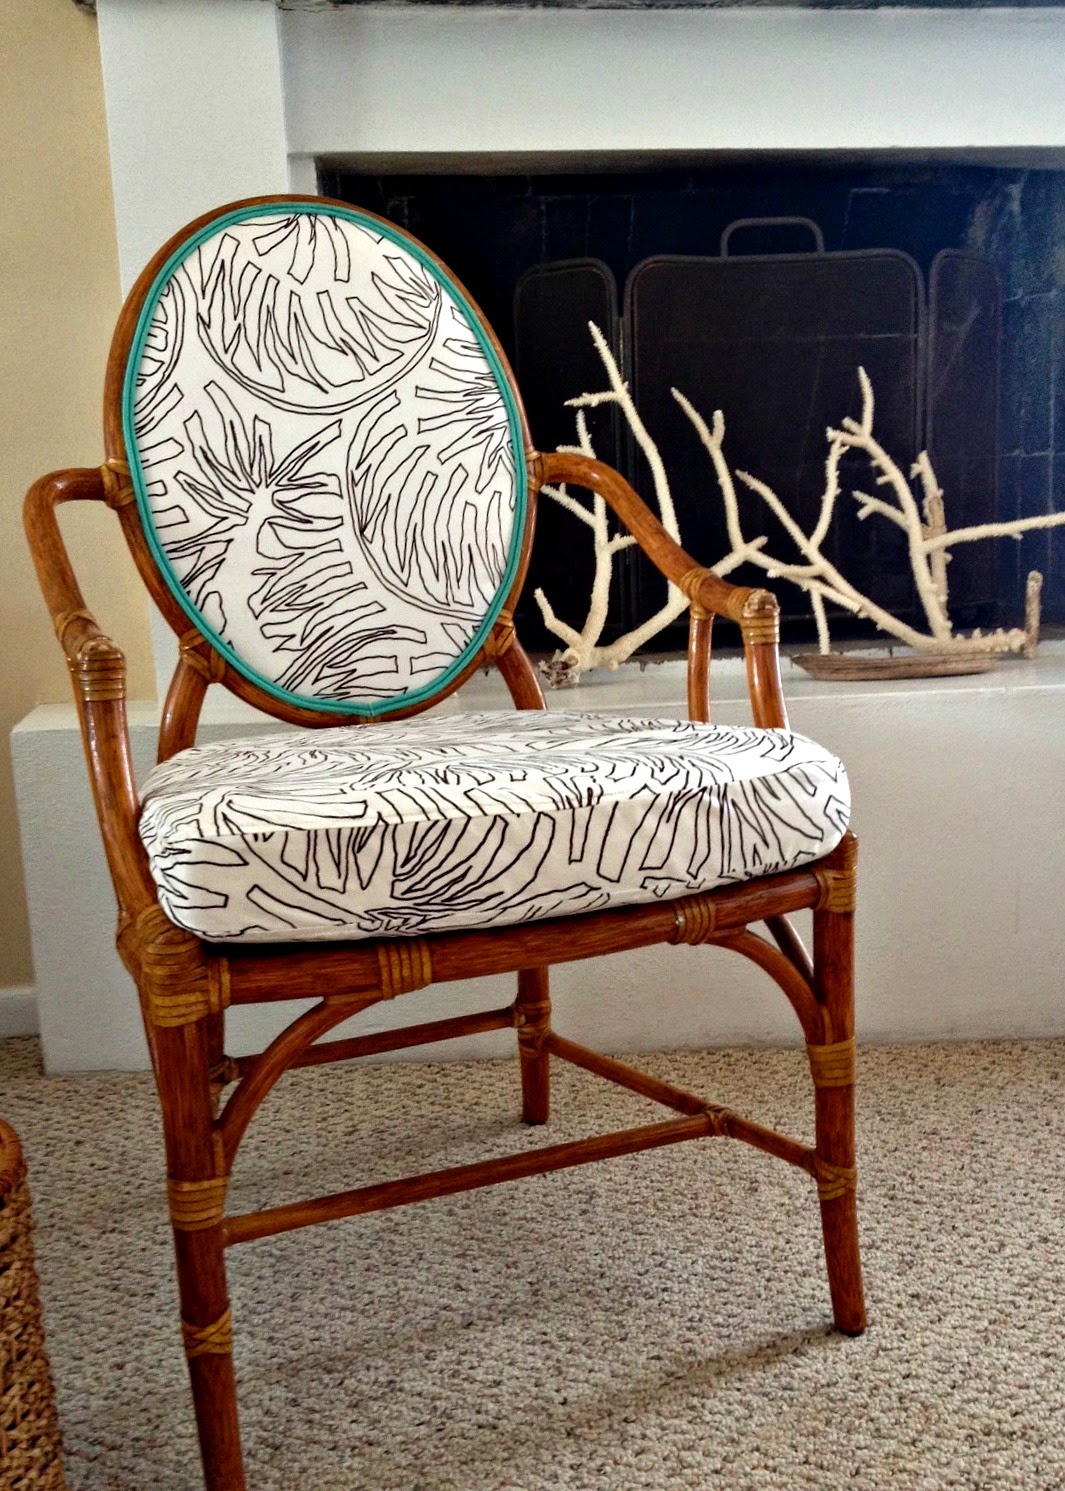
I acquired a pair of McGuire caned oval back chairs. I'm sure most of you may be saying, "so what does that mean"? Well, after four of these beauties hit an online selling site for a great price I knew I needed them! I did not know what or who McGuire was and did not even know the chairs may be worth a lot more than what they were being sold for. What I did know was they were beautiful and had big potential for becoming the accent chairs I needed for our living room. 


A friend of mine also wanted the chairs but decided we could agree on splitting them. She took two and I took two. After a close inspection she notices the gold plaque underneath the chair with the McGuire inscription. After paying for and collecting my chairs I did a bit of my own research. I found that on McGuire's website new dinning room chairs retail from about $1,000 to $2,500 each. In fact they sell the same chair on their website with instructions to contact a location for pricing. I then took to Ebay. I came across a set of four of the same chairs in a used condition that are being sold for $2,200.00! That is crazy to me, that's $550 per chair! 

I'm sure by now your curiosity is killing you and you want to know what I paid for the chairs to make it such a good deal? The answer is $37.50 each!


I have had these chairs for a few months and I finally decided to go and purchase the fabric for reupholstering them. 


The fabric on the far left is a Bahama Hand Prints frond print in chocolate brown on white fabric to be used as the seat and seat back. The center fabric is a turquoise-green fabric to be used for the piping on the seat back. The last fabric is for a different chair that I will share in this post as well. It is a sailboat print on tan fabric.  


These chairs were upholstered by a professional. The only DIY here was the choosing of the fabrics and the placement. I was so excited to get them back and see my idea come to reality! I am in love with how they turned out! So naturally I took tons of pictures to share :)


I have more to share! 

Remember the sailboat print fabric? Well this is where it went! I scored this chair from someone that was leaving the island. The cushions were a beige and red color fabric which would not have gone well in my master bedroom so I had them recovered. This chair is going to be the main piece of furniture for the reading nook in my room. 

I will be spraying the base of the chair white and share that process in another post. 


I also want you to notice my favorite Target finds from my last trip to America. The anchor bookends! I can't wait to get my shelves up and style them with these. 


I also have a few other projects in the works. These pieces were found in a warehouse of discarded furniture and other random items. They were dirt cheap and have so much potential! 


This faux bamboo chair and ottoman is going to be fabulous after a coat of paint and some newly covered cushions. 


 I also scored this faux bamboo framed mirror. I am still debating on painting this. I guess i'm holding out until I know which room its new home will be. What do you think? To paint or not to paint?


I hope you have enjoyed my new projects! Be sure to check back for updates on those projects in the works as well. 


Thanks for reading! :)


post signature

Monday, April 28, 2014

A little Island to our Vista: Day Trip to Exuma

Today's post is going to be a bit different. This blog is predominantly about our home projects and renovations BUT let's not forget about the "island" in Pinder's Island Vista. We do live in one of the most beautiful places on earth (not bragging at all) and its only right that I share with you all when I can. This weekend I was able to visit The Exumas. It was about an hour and a half boat ride on our boat and it was a bit bumpy getting there and back but it was totally worth it!

We trolled a bit and hooked a mahi! It was really exciting for me considering I usually don't fish (I'M more of a beach-goer). I even got a short video of Nick reeling it in. 


We even scored a few conch to make conch salad. There is just something about eating conch salad in the ocean. It makes a good beach day GREAT!


We went to the sand bar which was absolutely beautiful! Its about  two miles of beautiful white sand that protrudes out of the most crystal clear water. I will just let my pictures do the talking!


Isn't it beautiful? I just had to share it. This is also the reason why I don't have a new home project to share. Sometimes enjoying time with friends and in our paradise has to come first! Enjoy :)


post signature

Monday, April 14, 2014

Target Threshold Shelf Install


Remember when I said I would be sharing some of my fabulous finds from my recent trip to the U.S.? Well today is one of those days! While I was away I found the answer to my bare vanity wall problem. 

The wall to the right of the vanity in our master bedroom was very plain and was in need of a little something. The picture below shows a frame that I had put up there temporarily and this picture was prior to my rope mirror project


As I said...it just needed a little something. So, while at Target I came across this fabulous Threshold shelf set! It is a set of three shelves in varying sizes and the best part is it was only $25.29! You can't buy the supplies to make these for less than that in Nassau. 

Installing these was my project for this past weekend and I love how it turned out!


If any of you happen to be in Target this is what the box looks like. Trust me you should put them in your cart and worry about where to hang them later. You will not be sorry.


I only needed a few tools to get these shelves up. 
  • a level
  • pencil
  • philips screwdriver
  • screws (came in the box)


Next I put the shelf up to the wall where I wanted it and put the level on top before I made my marks for the screws.


I removed the level and put a small pencil mark right where the shelf touched the wall and where the slot for the screw is. 


I then screwed the screws into the wall over the mark that I made. I left the screws out from the wall a bit so that slot on the shelf would be able to fit over it.


Then I hung the shelves and started loading them up with some pretty things like the gorgeous flowers that I trimmed from our backyard!


Now the vanity area looks complete! The shelves add just a bit of interest and some much needed storage space for our vanity.  


Thanks again for reading! Any comments or questions on this quick project is welcomed :)


post signature